The Fundamentals of the 1,000 Yard Shot
The Fundamentals of the 1,000 Yard Shot
The first time I saw a target at 1000 yards, I was in high school. At the time, it seemed like an impossible distance, something only attainable by elite shooters with unlimited funds. A few years later, I would find myself at sniper school. And after an iron sight qualifier and a few classes, we were at 1200 yards on the first afternoon of shooting. While the equipment we were using was undoubtedly a step up from the 30-30 I grew up shooting, there’s no reason why someone today couldn’t achieve something similar, even without the U.S. government’s financial backing.
Choose the Right Gear
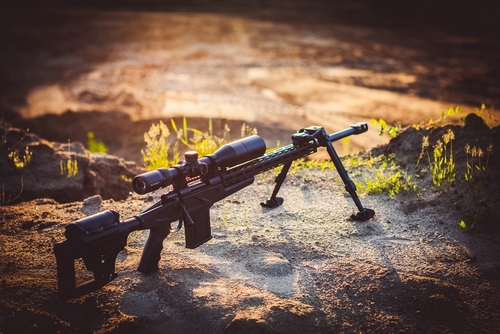
There is no shortage of rifles today that can make this shot right out of the box. Choose a quality rifle in a serviceable caliber that can deliver a high-ballistic-coefficient (BC) bullet at least 2600 FPS. This should ensure it reaches 1000Y still supersonic and stable.
Next, be sure not to handicap yourself with bad ammo. Pick up some purpose-built, high-quality long-range ammo. These will be “heavy for caliber,” while lighter bullets leave the muzzle faster, they generally lose velocity more quickly. You’re looking for a G1 BC of .500 or better.
The keystone of this setup is the optic; you don’t have to refinance your house, but don’t cheap out here either: a scope of at least 10x with reliably tracking turrets that can dial in elevation and return to zero. And a solid MIL or MOA reticle. No duplex or BDC, as these don’t give you the information needed for second round corrections.
Everything after that is optional. However, some things that will make life easier are a bipod, a rear sandbag, a rifle-mounted bubble level, and a buddy with a spotting scope.
Dry-Fire
This step is often overlooked but can make a huge difference in your shooting. It’s as simple as getting in position behind an empty gun, focusing on a small aiming point, practicing breathing, and squeezing the trigger without disturbing the reticle. This will not harm your gun, and taking five minutes a couple of times a week can make noticeable progress.
Put in Time on Paper AT 100 YARDS
This is where you will ensure your fundamentals are solid and that the gun is mechanically sound. Here is where you learn to call your own misses. For example, if you break a shot 5-0’clock low and call it, if that’s where it hits, you know everything is in order, you just made an imperfect shot. If your range allows, do this from the prone position. This is preferred over bench shooting because bench shooting doesn’t develop good fundamentals. Shoot 3-round groups until you are confident with the results. One-inch (1MOA) groups should be the goal ere.Stretching the
Distance
Nothing about your shooting changes between 100 and 1000 yards —just some ballistic magic. Your two main enemies are gravity and wind, and gravity is the easy part of this equation, as it is a constant. I wish I could tell you what elevation you need to hit at 1000, but there are too many unique factors. The two main ways to figure out your gravitational drop are the old-school and new-school ways. The old-school way would require you to have access to the range. Walk your rifle out to distance, starting close and noting the elevation you dialed into your optic to achieve a centerline hit at each range. This is known as “data off previous engagements, or D.O.P.E.” The new school is to use ballistic software. These are more attainable than ever; there are some free apps and great handheld devices.
These can also help you develop your wind holds. While these are great tools, they are only as good as the data you give them. They need to be confirmed with real-world data. The more you do this, the more accurate they become.
Wind
Wind is your greatest adversary. It is the most dynamic external factor affecting the bullet. Not only is it constantly changing, but it may be completely different at your target. It is not uncommon for a bullet to experience three different winds during its flight. There is no single answer for wind. Faster, more efficient bullets will be affected less, but no bullet is immune. Because wind is so dynamic, I won’t dial my scope for atmospheric wind; instead, hold your crosshairs into the wind. For example, for a mild left-to-right wind, I may start by holding the left edge and adjust from there. The best way to learn to deal with wind is practice shooting in the wind and calling wind for others. This is the hardest skill to develop in long-range shooting. Start with the knowledge that 3 MPH is about the minimum you can feel.
I recommend you start thinking in terms of calling wind speed and direction. Look around whenever you are outside and compare your estimate to the actual wind speed, whether on an app or a wind meter.
Putting it All Together
All of the pieces are in place, you are confident in your gear, confident in your fundamentals. You have good ballistic data on your gun and ammo. There’s nothing left but to shoot. Your best bet is to get out early before the winds pick up. A humid day will give you the best visual of the bullet trace through the air. Error on the side of hitting short because it is easier to correct for a bullet that lands short rather than one that sails over the top. Make bold corrections. And keep in mind that 1 MOA is 10” at 1000Y. If things aren’t going your way, don’t be afraid to bring it back in to check your zero and fundamentals. Lastly, be patient and have fun! If this is something you enjoy, I encourage you to shoot a match. That is a great place to learn from other shooters in a supportive environment.
March 2026
By Cody Congdon
For Leading Dairy and Cattle Industry News: