Pass The Time With DIY Deer Hunting Projects

Pass The Time With DIY Deer Hunting Projects
How many of you whitetail archery hunters already have a count down to opening day on October 1st? Chalk me up as guilty. The good news is that every day the sun rises we are one day closer to that glorious day. The bad news; we still have, depending on when you read this article, four months to count down from! To heck with the person that coined the phrase “Patience is a Virtue”, I want it to be deer season now!
Waiting for archery season to open is agonizing especially when the wait is still several calendar months out. Luckily for me though I ease the pain with archery related activities to help pass the time. While it doesn’t come close to being out in a tree stand, having projects that you can pass the time with does help the days go by a bit quicker. Below are just a few of the projects I have done this year and in past years.
Build A Rubbing Tree For Food Plots
Last fall I was sitting in a stand overlooking a bean field. In the middle of the field was a telephone pole that had been rubbed raw by a large whitetail. This got me thinking that maybe I could actually recreate this scenario and use a cedar fence post to act as a fake rubbing tree in my food plot.
What you need to build a fake mock rub tree:
- 6’ or 8’ x 6” or 8” cedar fence post.
- Heavy-duty knife
- A shovel or post hole digger used to remove and tamp dirt.
- Ready mix cement
- Water for mixing cement
Step 1:
Make a rub on the post. Take a heavy-duty knife and rub the post in an up and down motion. This will remove shavings and create a rubbed appearance. Don’t over do it, all you need to do is start the process. Take note that you will want to make the rub in proximity of where a deer would rub the post. Factor in that you will be planting two feet of the post into the ground. I made my rubs right at the five-foot mark on an eight-foot post. This will leave the rub you made at the three-foot mark after you are finished
Step 2:
Dig a two-foot hole with a post digger or shovel in a food plot or near a stand site that you have selected and place one end of the fence post into the hole.
Step 3:
Place six inches of the dirt you removed back into the hole and tamp the post into place. Make sure post is level.
Step 4:
For added support pour the recommended amount of water and concrete mix into the hole. Level the pole, if necessary one final time.
Step 5:
Let the cement set. Cover the cement with dirt, leaves and grass to add realism.
Step 6:
Add some scent. I added some buck urine to the pole itself and later in the year I will slip in and add some mock rub scent to the post.
There you have it, creating a fake rub tree is that easy! Will it work? I have no idea, but I am excited to see the results.
Scent Killer and Cover Spray
Tired of spending money on name brand scent killer and cover sprays? Well don’t worry with a little time and the use of some common household items you can create your own.
Homemade Scent Killer Spray:
- Large mixing bowl
- 16 ounces of Hydrogen Peroxide
- 16 ounces of Distilled Water
- ¼ cup baking soda
- 1 ounce unscented hunters shampoo
- 1 used/cleaned milk jug
- 1 spray bottle
-
- Mix all of the liquids together in the large mixing bowl until the baking soda has dissolved.
- Then pour into the milk jug and let sit unrefrigerated and out of direct sunlight.
- After the mixture has sat for a few days, pour some into the spray bottle and use when needed. Note that pressure will build in the milk jug so do not tighten the cap all the way.
- Apply it to your clothing as normal and you have homemade scent killer spray.
*If you make a batch early in the year make sure to shake the mixture thoroughly before you use during the season
Homemade Cover Spray:
- Cooking pot
- 1 gallon of distilled water
- Strainer
- Stove
- Earthen Materials (pine needles, leaves, grass, dirt)
- 1 milk jug used and cleaned
- 1 spray bottle
- Funnel
- Gather 1-3 lbs. of natural material from the area in which you will be hunting (amount of material will depend on the type of material). This can be any earthen material that is natural to your hunting environment. For example pine needles, acorns, tree leaves, or even dirt work great.
- Place the gathered material/s in a large pot. Add distilled water until the material is completely submerged. Do not over fill the pot.
- Place the pot over high heat. When the water begins to boil, cover the pot and turn heat to medium. Allow the materials to simmer for 25 minutes.
- Remove the pot from the heat. Pour the liquid through a strainer and into a large bowl. Discard the solids.
- Once cool place a funnel into the plastic spray bottle. Transfer the liquid from the bowl to the spray bottle by pouring it through the funnel.
- Use just like you would normally do so when preparing to go out on a hunt.
* Note that if you use dirt your liquid will be a stained color; this will not harm your camouflage and will be removed once you wash your clothing.
Lighted Nocks
Lighted nocks are a great tool to help an archer see the arrow flight in low light conditions. More importantly, where that arrow enters or misses a whitetail. The problem with brand name lighted nocks is they are extremely expensive! Costing upwards of $30.00 for a three pack or in some instances a two pack, name brand lighted nocks can be too expensive to consider.
There is an alternative though; you can make your own lighted nocks from scratch. The end result is a perfectly functioning lighted nock that cost around 60% less than the store bought nocks.
Material You Need:
- Two fluorescent nocks of any color (wider diameter style nocks work the best).
- Thill Push On, Pull Off Bobber Light
- Epoxy/Adhesive
- Sand paper
- Hack saw
- Vise
- Hunting Arrow/s
The overall process is pretty easy.
- Take the first nock and make sure the lighted end of the Thill bobber fits all the way into the nock. If it doesn’t you will need to sand the inside of the nock and the plastic part of the bobber light. Skinny diameter nocks such, as X nocks do not work well.
- Once you have determined the lighted end fits into the nock then you will need to glue it in place. Take some epoxy or strong bond adhesive and dab it on a piece of cardboard.
- Take the lighted end, and dab the PLASTIC only part of the component with glue. If you glue the metallic part of the light it will bond with the nock and you will lose the ability to turn the light on and off. Let sit for 10 minutes.
- Now you will have to cut the second nock into two parts. We need the stop or insert end of the second nock, at least ½”. With a hacksaw and vise (if available) simply cut off the stop part of the nock, you can discard the other piece of the nock.
- Fill the stop you cut off of the second nock with glue and push the unlighted end of the light into the glue. Wipe away any glue that leaks out with a cloth immediately.
- Wait for the glue to dry until all of the parts are securely attached. Sand the stop down with sandpaper until it is smooth and fits cleanly into your arrow, take note that too lose is not ideal. A good snug fit is ideal.
- Slip the nock stop into the end of the arrow and line up end of the nock and the fletching on the arrow. Gently push the nock into the arrow until it is flush with the shaft. Take your time, as you don’t want to damage the light’s components.
- To turn on the light simply push on the top of the nock. To turn off pull on the nock.
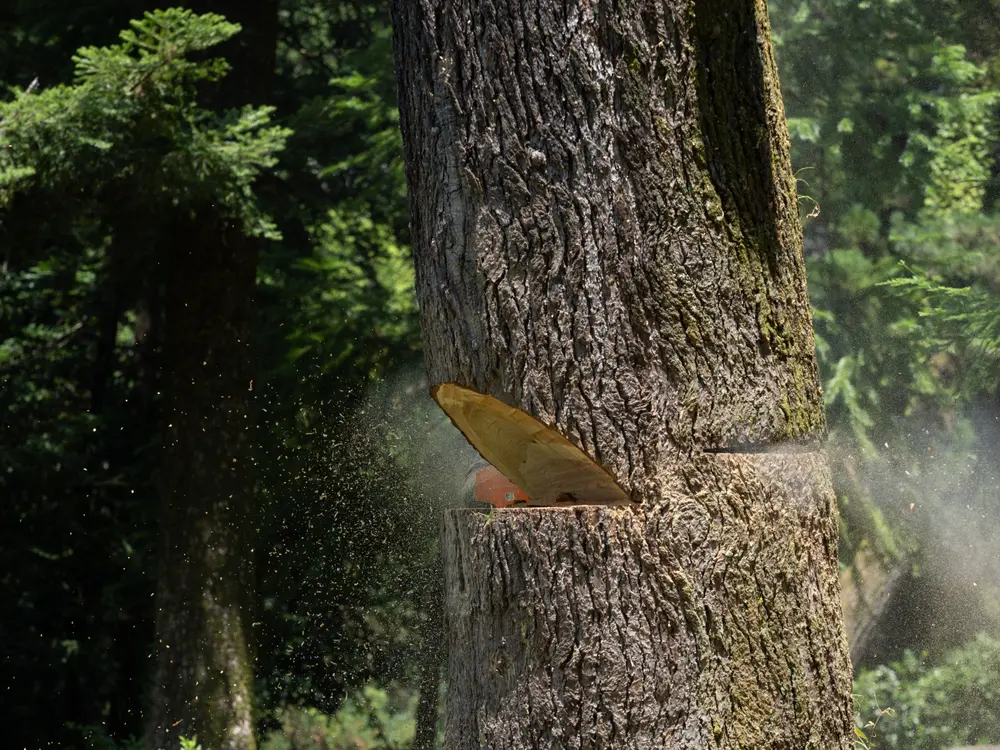
Hinge Cut a Bedding Area
“Hinge Cutting” or “Hinging” a tree is simply cutting a tree with a chainsaw at an angle about halfway through at chest height and then pushing it over so that entire tree except for the top is off of the ground.
It’s called hinging because you are not completely felling a tree. By cutting at angle halfway through the tree and pushing it over the tree will keep a strap or hinge that connects to the trunk. Keeping the tree in tact will allow the tree to stay alive for a couple of years, which provides great benefits for bedding cover.
Hinging trees is a great tool to build bedding cover for whitetails because it provides overhead cover, ground cover, and promotes new growth by allowing sunlight to hit the timber floor. Along with cover, hinged trees provide more browse at ground level for deer to consume while bedding.
Hinging a bedding area is simple, cheap, and takes little time to create. In fact in a few hours you can have a few dozen trees hinged and a good start to a new bedding area created. The deer will welcome the new security and comfort of the added overhead and ground cover as well as the browse that you have provided. In fact you if deer feel comfort in the new bedding area they will begin to use it almost instant, provided you have provided enough security.
Material Needed:
- Chainsaw
- Eye protection
- Face protection
- Gloves
- Plan where you want your bedding areas. Great spots are hillsides and ridges where deer have an elevated view of approaching predators.
- Consult a forestry biologist to determine what trees are best to hinge in the area. Ask the biologist if there is any cost share initiatives available for a project like this.
- Make sure you are savvy with a chainsaw! Trees and chainsaws equal danger especially if you are unfamiliar with cutting trees. Read the safety manual and user guide and always treat your chainsaw as a potentially deadly weapon Make sure you are aware of the common problems that arise when cutting down trees such as “pinching” and “hang ups”. If possible work with a partner. If you work alone make sure you have a cell phone that is readily accessible in the event of injury.
- Before you cut, mark which trees you want to cut and the direction you want them to fall. Note that large trees do not hinge well and most of the time will snap off due to their weight. This is something you want to avoid because the tree will die immediately and be lying flat on the timber floor. The exact opposite of what you are trying to accomplish. Try and find smaller trees that are 12” or smaller in diameter.
- Start with a tree that can be dropped easily into a gap or opening without falling against another tree and getting hung up. Next locate one or more trees that can be hinged over or beside your starter tree. Then you can work outwards from the point.
- Once you have your plan identified you are ready to cut. To make a correct hinge cut start with a 45-degree angled cut at about chest height.
- Cut halfway through the tree in the direction the tree is leaning. If the tree is flat cut in the direction you want to push the tree.
- Remove the blade and push the tree over in the direction you made the cut.
In Conclusion
That is all there is to it! Hinging trees for cover and browse is really a simple process. It saves you a lot of time and money in relation to other land management practices, but yet is effective in achieving your goal. Remember that hinge cutting isn’t a permanent solution for providing cover, as the trees will eventually die off. After a few years you may need to hinge cut a different area.
Projects like the ones I mentioned above are great ways to pass the time during the off-season, not to mention fun to do and they save a few dollar bills in the process. If you have the off-season blues put yourself to work with projects like these or some other deer hunting projects such as hanging new stands, planting food/hunt plots and scouting.
The season is still a long ways off and if you are like me deer hunting is always on my mind so why not fill that void with activities that revolve around your deer hunting passion.
May 2018
